
.jpg)
When I first started making soap I knew that I wanted to use what we could provide here from the farm as much as possible. I also wanted something that would have a nice lather and I was interested in experimenting with different colors and natural additives. I originally made four different kinds of soap: A plain soap; cinnamon swirled because it was so pretty; honey-oatmeal which is great for exfoliating; and a cucumber soap which is supposed to be good for acne. The basic recipe for all the soap is the same. I checked out lots of different websites with soap recipes and tweaked them into my own as follows:
~
Terri's Goat's Milk Soap
This recipe makes a great, hard bar of soap with lots of lather and bubbles!
20 Ounces Lard
12 Ounces Olive Oil
8 Ounces Coconut Oil
This recipe makes a great, hard bar of soap with lots of lather and bubbles!
20 Ounces Lard
12 Ounces Olive Oil
8 Ounces Coconut Oil
2 Ounces Castor Oil
5.7 Ounces Lye
15.2 Ounces Goat Milk (Previously frozen, and then thawed to slushy stage)
Scents (I prefer to use 2 ounces) or Additives of Choice
Another simple soap recipe that I use to make laundry detergent (This tends to make a soft bar of hand soap, but it is great for shredding into laundry soap) :
Laundry Bar Soap:
20 ounces Canola Oil
8 ounces Coconut Oil
12 ounces Olive Oil
5.6~ounces Lye
14.4~ ounces Goat Milk (Previously frozen, and then thawed to slushy stage)
Scents (I prefer to use 2 ounces) or Additives of Choice
5.7 Ounces Lye
15.2 Ounces Goat Milk (Previously frozen, and then thawed to slushy stage)
Scents (I prefer to use 2 ounces) or Additives of Choice
*Rendered lard (your own or from the butcher) works the best for this recipe.*
Another simple soap recipe that I use to make laundry detergent (This tends to make a soft bar of hand soap, but it is great for shredding into laundry soap) :
Laundry Bar Soap:
20 ounces Canola Oil
8 ounces Coconut Oil
12 ounces Olive Oil
5.6~ounces Lye
14.4~ ounces Goat Milk (Previously frozen, and then thawed to slushy stage)
Scents (I prefer to use 2 ounces) or Additives of Choice
Additive Options:
Honey Oatmeal soap: add finely ground oatmeal and 1 tsp. honey.
Cucumber soap: add finely chopped cucumbers.
Cinnamon Swirl soap: add cinnamon to half the batch of soap after trace, then pour the colored soap into the plain soap, gently swirl. Don't mix too much, as you only want a pretty swirled look.Basic Directions:
*Prepare your molds~ Spray plastic molds with cooking spray. Line other molds with plastic wrap.
*Measure the lye, set aside.
*Heat oils to 90 degrees in a stainless steel pan.
*Pour slushy goats milk into a stainless steel container, place in a sink with ice water. Slowly add the lye to the milk while continuously mixing with a wooden spoon. Cool to 90 degrees.
*Add the warm oil to the milk solution and mix with a stick blender (off and on) until light trace.
*At light trace add any scents, colors or exfoliates.
*Continue to mix. At trace pour into prepared molds.
*Wrap with plastic wrap, then cover the mold with a towel.
*After 24-48 hours cut the bars (wear plastic gloves as the lye can still burn your hands). Allow soap to cure 3-8 weeks before use.
Supplies needed: Stainless steel pail, stainless pan for the stove top, scale, thermometer, wooden spoon, spatula, electric wand mixer, soap mold, saran wrap or cooking spray, plastic gloves, safety glasses, newspaper, old bathroom towel, vinegar (None of the mixing items should be used for food use again).
Always wear plastic gloves, long sleeves, and eye protection when making soap.
A great website for ordering everything soapy: Brambleberry.
 To start with, prepare your work sight and everything you will need to make soap. I haven't had a problem creating soap in my kitchen, with the windows open for ventilation. FYI~ only use glass or stainless steel to mix your soap in, and don't plan on using them again as they could possibly retain some lye. I use stainless steel milk pails as they are high enough to prevent spills.
I lay out newspapers at each of my work stations (next to the stove top, next to the sink, and on the island where I will set my pail to mix) for easy clean up and to catch any spills.
Once you have all of your supplies out, start by preparing your soap molds. If you are using a wooden soap mold (like I am), you will line it with saran wrap, taping it down as needed. My wooden molds measure 15" long, by 2 3/4" high, and 3 1/2" wide inside diameter. They are the perfect size for this recipe, and you end up with 14 nice sized bars of soap.
 Spray your plastic molds lightly with cooking spray. Any plastic container, or even a cardboard box lined with saran wrap will work fine. Just be sure that you don't make your soap too thin, or else it will curl as it dries.

Pour your slushie goat's milk into your pail, and set in a sink with ice water. Pre-measure your lye and set aside.
 When everything is prepared, it's time to heat up your oils. You want to reach a temperature of 90 degrees. The oils heat up rather quickly, so keep a close eye on them. Once you reach temperature, shut the heat off and set the pan aside if you are using an electric stove to prevent overheating.
 Now, let me put the fear of God into you about lye. Lye is caustic: it will burn, it will blow up your kitchen, and you have the potential to lose your eyesight and will never be able to gaze upon the love of your life or your sweet little dumplings ever again if you are not careful. Be warned! And then just be cautious. NEVER, NEVER pour your liquids into your lye. Always pour the lye into your liquid~ slowly.
If you happen to get lye splashed on you, or even start to feel any tingling while making your soap, pour vinegar over the affected skin. Eyes would need to be rinsed out with water, and then seek immediate medical attention (but of course you're wearing your protective glasses). Don't hover over your pail! Don't ask me why . . . Turtle necks are great to wear while making soap.
Slowly, pour your lye into your slushie milk in the sink of water and ice. Your milk will start out white, but you will soon see it turning yellow. If you pour the lye too fast, it will actually burn and even curdle your milk. The slower you pour your lye, the lighter your soap will be. The quicker you pour, the darker your soap will be.
The lye is going to heat up the milk: sometimes very fast, sometimes slow, depending on how cold your milk and your sink is, and how fast you are pouring. You are trying to achieve a nice, steady increase in temperature. If the colors stay a pretty yellow it is a good indicator that your milk is not too hot and not too cold~ orange means "too hot" and you need to add more ice to your sink.

 Once you are at 90 degrees, take your pail out of the sink and put it on your newspaper lined work station. Slowly add your warm oils while mixing with your wooden spoon.
  Now it's time to start blending. A stick blender works great for this (but remember, you can't use it again for food use). It is possible to mix by hand with a wooden spoon, but it will take about 2-3 hours of constant mixing.
The mixture will start out pretty thin, but within 10-15 minutes you will begin to have a pudding consistency. This is called "trace." You are looking for a light trace so that you can add your scents or additives. When your mixture starts to get thicker, take your wand and drizzle the soap across the top of the mixture~ if it holds itself up, you are at trace.
 At a light trace you can add your scents and additives. Watch your soap carefully at this point. This is prime time for seizing (when additives make your soap instantly become rock hard). I have personally never had any soap seize, but there's always a first time. More often I find that the soap thins out as you have added more liquids. Mix until you get back to a thicker trace, keeping in mind that your blender is warm by now, too, and adding to the heat of your soap mixture. It is fine to let the soap sit quietly for a couple/few minutes rather than burn out your blender or overheat your soap.
At this point, since I am layering this batch of soap, I will pour part of my batch back into my oil pot.

Next add your colorant to the pail and mix again.

 I scrape off every last little bit with the spatula.
 And then pour.
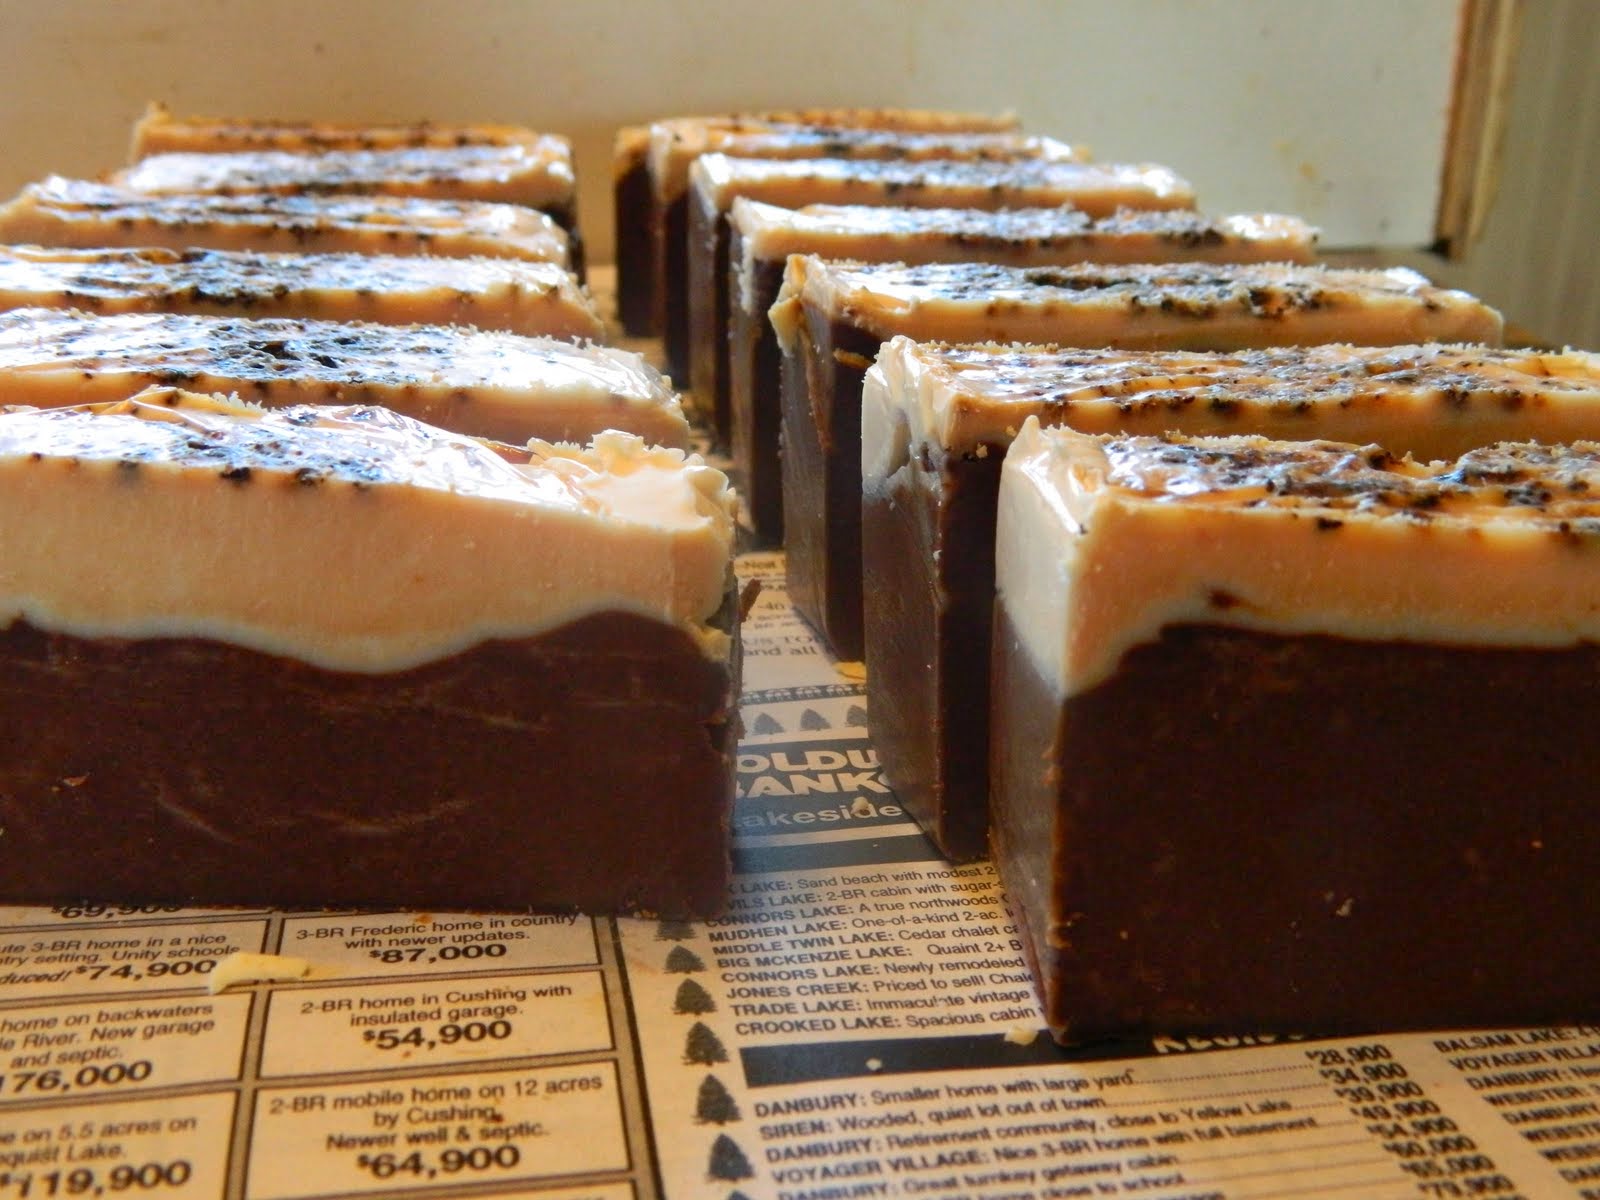
Next, I pour my light color on top.

Because I used Hazelnut Coffee scent, I sprinkled the top with coffee grounds to look pretty.
 Then I cover the soap with saran wrap, and wrap it all up in an old bathroom towel to incubate over night. To prevent soda ash you will want to gently press down the saran wrap to reduce any air getting to your soap. After 24-48 hours it's time to cut your soap. If you happen to peek at your soap before this time frame and see a big, gooey mess don't worry just yet~ soap goes through a gel phase, but within 12-24 hours it should be back to a nice, beautiful log of soap that is ready to cut. If it feels too soft, let it sit longer until it hardens.
*After having some recent batches overheat, I have been experimenting with not insulating my goat's milk soap with great results. To gel or not to gel is another post for another day.*
 I use a cheese cutter to get perfect sized bars, but you can also use fishing line, knives, or fancy crinkle potato slicers (just remember, don't use them for food again). The lye can still burn you at this point, so always wear gloves while cutting your fresh soap.
Find a spot to let your soap cure. I have a drying rack, lined with newspaper, in an out of the way closet. Basements are too damp to allow proper curing, and warm spots will dry out your soap too quick. After 3-8 weeks your soap will be fully cured and ready to use. Soap never goes bad, and only gets better with age.
Enjoy the benefits of your very own homemade goats milk soap!
Other OurCrazyFarm soapy links:
(click on the title to be redirected)
(click on the title to be redirected)
Goat's Milk Soap Laundry Detergent
************
Soap is great, but have you found eternal life?
Read Trent's story here.

It is only considered “the unthinkable” because our plans are not God’s plans, and our ways are not God’s ways.
Before Trent was born we had entrusted the Lord with his life and had asked Him, above all else, to bring salvation to our son. Our greatest desire was that he would be used in a mighty way for God’s glory, and that God would let him dwell in heaven for eternity.
Trent was a boy who truly lived. From the very beginning he did what he loved and enjoyed to the full the gifts and skills that God had given him. In his short life he saw much of this world, traveling as far as India, the Bahamas, Bass Pro Shop in Missouri where he explored his favorite destination on his golden birthday, as well as many family camping trips. God instilled a love of hunting and fishing in Trent, and a joy of the great outdoors. Since he was little all he wanted was to turn 12 to be able to go deer hunting. During his 12th year God allowed him to shoot two deer. Trent loved to pick on his siblings Alexis, Cole, Grace, and Micah, to protect his mother, to snuggle with his father, and to be with his friends, especially his best friends: Thomas and Samuel. He tried everything that interested him, even carving his own long bow and succeeding in taxidermy. In his short years he lived life to the fullest.
But as we are all destined to, Trent also died. On Friday, February 18, 2011, we said goodbye to our son as he left for a skiing trip with his friends, not knowing that he would never be coming back home. God says that He knows the number of our days, that He has created each one, and that He will do what He pleases (Psalm 115:3; Job14:5).
God’s standards to enter His kingdom are high: He expects perfection. Trent was not perfect, not even close. God graciously provided His perfect Son, Jesus Christ, as the atonement for our sinfulness and requires that we simply believe and acknowledge Him for it.
For most of his life Trent struggled with his own sinfulness before God. He knew that he was not right before God, and nothing he could do would ever make up for the sins he had committed to make him worthy to enter heaven. In the spring of 2010, God graciously chose to bring salvation to Trent through repentance and the saving grace of Christ Jesus. Trent’s life was transformed and we enjoyed the young fruit in his life as we watched God work.
It was with great peace and much rejoicing, then, that we as his family have sent him off before us and accepted God’s perfect plan for Trent’s life. Our longing is that God would be glorified in what He has done to wake up many to the realization that we are not guaranteed any number of years in this world (Psalm 39:4-5).
On Friday morning we had our son; on Friday afternoon he was gone.
What we have asked so many people since the accident is: “What if it had been you? Where would you be right now?”
God's mercies are new every day and His peace does surpass all understanding (Lamentations 3:22-23; Philippians 4:6-7). God has been so gracious to us by blessing us first of all with His peace in His perfect plan. The family and friends who have surrounded us and have lifted us up in prayer are amazing and another testimony to God’s goodness.
It is with great rejoicing that we release our son, Trent, age 12, to our Heavenly Father. Dance before your King, my son.
************
Soap is great, but have you found eternal life?
Read Trent's story here.

On Friday February 18, 2011, God did the unthinkable in our life: He chose to take our 12-year-old son, Trent, home to heaven in a skiing accident.
It is only considered “the unthinkable” because our plans are not God’s plans, and our ways are not God’s ways.
Before Trent was born we had entrusted the Lord with his life and had asked Him, above all else, to bring salvation to our son. Our greatest desire was that he would be used in a mighty way for God’s glory, and that God would let him dwell in heaven for eternity.
God answered our prayers that Friday in a mightier way than we could have imagined, and we have been rejoicing in His good works and His mercies ever since.
Trent was a boy who truly lived. From the very beginning he did what he loved and enjoyed to the full the gifts and skills that God had given him. In his short life he saw much of this world, traveling as far as India, the Bahamas, Bass Pro Shop in Missouri where he explored his favorite destination on his golden birthday, as well as many family camping trips. God instilled a love of hunting and fishing in Trent, and a joy of the great outdoors. Since he was little all he wanted was to turn 12 to be able to go deer hunting. During his 12th year God allowed him to shoot two deer. Trent loved to pick on his siblings Alexis, Cole, Grace, and Micah, to protect his mother, to snuggle with his father, and to be with his friends, especially his best friends: Thomas and Samuel. He tried everything that interested him, even carving his own long bow and succeeding in taxidermy. In his short years he lived life to the fullest.
But as we are all destined to, Trent also died. On Friday, February 18, 2011, we said goodbye to our son as he left for a skiing trip with his friends, not knowing that he would never be coming back home. God says that He knows the number of our days, that He has created each one, and that He will do what He pleases (Psalm 115:3; Job14:5).
God’s standards to enter His kingdom are high: He expects perfection. Trent was not perfect, not even close. God graciously provided His perfect Son, Jesus Christ, as the atonement for our sinfulness and requires that we simply believe and acknowledge Him for it.
For most of his life Trent struggled with his own sinfulness before God. He knew that he was not right before God, and nothing he could do would ever make up for the sins he had committed to make him worthy to enter heaven. In the spring of 2010, God graciously chose to bring salvation to Trent through repentance and the saving grace of Christ Jesus. Trent’s life was transformed and we enjoyed the young fruit in his life as we watched God work.
It was with great peace and much rejoicing, then, that we as his family have sent him off before us and accepted God’s perfect plan for Trent’s life. Our longing is that God would be glorified in what He has done to wake up many to the realization that we are not guaranteed any number of years in this world (Psalm 39:4-5).
On Friday morning we had our son; on Friday afternoon he was gone.
What we have asked so many people since the accident is: “What if it had been you? Where would you be right now?”
We diligently raised Trent up to know his sinful state and taught him what the Word of God says because we know the implications of denying Christ now, and God was gracious to answer our prayers and to save him. Scripture says that the gospel will go forth with much sorrow and heartache. Please let Trent’s short life be a wake-up call to you. We are rejoicing in the sorrow because we know where our son is and that we will one day be with him again for eternity because of our own salvation.
God's mercies are new every day and His peace does surpass all understanding (Lamentations 3:22-23; Philippians 4:6-7). God has been so gracious to us by blessing us first of all with His peace in His perfect plan. The family and friends who have surrounded us and have lifted us up in prayer are amazing and another testimony to God’s goodness.
It is with great rejoicing that we release our son, Trent, age 12, to our Heavenly Father. Dance before your King, my son.
14 comments:
Could you please specify whether you are measuring your oils by liquid measure or by weight.
Could you please specify whether you are measuring your oils by liquid measure or by weight.
The oils are measured by weight. Happy soap making!
What did you add to your soap to make it dark colored, and how much? Was it cinnamon, cocoa, something else? Very excited to try this recipe out tonight after my kids are in bed!
Jfrog~ I used cocoa to make the dark brown color, but don't use too much or you get chocolate hands, chocolate cupboards, chocolate everything:) Try starting with 1/4 tsp and adjust accordingly. Brambleberry offers nearly unlimited color choices as well to match your scent. For a beautiful layer effect, check out my Lemon Poppyseed goat's milk soap tutorial here:
http://ourcrazyfarm.blogspot.com/2013/04/lemon-poppyseed-goats-milk-soap.html
Or a green Spearmint Eucalyptus version here:
http://ourcrazyfarm.blogspot.com/2014/03/spearmint-eucalyptus-goats-milk-soap.html
I was drooling over the lemon poppyseed one. Absolutely gorgeous! It's getting added to my never ending soap to-do list :). Is regular cocoa okay or does if need to be a special one from bramble berry? This will be my first attempt at both goats milk and colored soap. I'm hoping to make tonight and I have cocoa in the pantry. Thank you!!!
Yes, regular cocoa from the pantry will work fine, just don't use too much:) If you do a google search for "natural soap color" you will find that there are other pantry spices that will give you a variety of colors, too.
Goat's milk soap is best to work at a cool temperature (90 degrees works best for me). Keep plenty of ice readily available to add to your sink of cold water if the temps spike quickly, and if need be, you can add a couple of small cubes directly to the milk/lye pail.
I have started placing my soap mold in the freezer (after pouring the soap) for an hour to prevent overheating, as well.
Have fun soaping! Hope your soap turns out beautiful!
I have just begun making goat milk soap and my first couple of batches I tried the ice bath method, but I still got an ammonia smell to the lye/milk mixture and then to the entire batch of soap. Have you ever had this happen to you?
Blessings,
Michelle
PreciousPeas~
That ammonia smell is a normal smell in milk soaps at the time of mixing and even during the initial curing process. If all went well, it should disappear within the first few days of the soap being cut and cured. Don't fear, your final soap will not (should not) smell like ammonia.
A couple of thoughts:
Check your lye container and make sure it says 98% sodium hydroxide (or 99 or 100%)? It needs to be sodium hydroxide only.
Are you using high quality scents? That could possibly be the culprit of an off smell. Brambleberry has some high quality products for soap making. Unscented soap should not smell like ammonia, even after cured.
If these are ruled out, my suggestion would be to let the soap cure, then check it again in a few weeks to see if the smell has disappeared.
Happy soap making! Terri
Thanks Terri for the great advice!
Do you use raw, pasteurized or unpasteurized goat milk? I was told to use unpasteurized. What is best? Thanks!
Mama Bear~ I use raw, frozen goats milk. Happy soap making!
One last question. Kinda silly, but do you buy it already frozen or can you freeze the raw milk yourself? Thanks for the great info!
After straining the goats milk I freeze it in Ziplock bags (I leave some air room for the milk to expand as it freezes) in the amount needed for the soap recipe.
You're welcome:)
Post a Comment