
.jpg)
When I first started making soap I knew that I wanted to use what we could provide here from the farm as much as possible. I also wanted something that would have a nice lather and I was interested in experimenting with different colors and natural additives. I originally made four different kinds of soap: A plain soap; cinnamon swirled because it was so pretty; honey-oatmeal which is great for exfoliating; and a cucumber soap which is supposed to be good for acne. The basic recipe for all the soap is the same. I checked out lots of different websites with soap recipes and tweaked them into my own as follows:
~
Terri's Goat's Milk Soap
This recipe makes a great, hard bar of soap with lots of lather and bubbles!
20 Ounces Lard
12 Ounces Olive Oil
8 Ounces Coconut Oil
This recipe makes a great, hard bar of soap with lots of lather and bubbles!
20 Ounces Lard
12 Ounces Olive Oil
8 Ounces Coconut Oil
2 Ounces Castor Oil
5.7 Ounces Lye
15.2 Ounces Goat Milk (Previously frozen, and then thawed to slushy stage)
Scents (I prefer to use 2 ounces) or Additives of Choice
Another simple soap recipe that I use for making laundry detergent (This tends to make a soft bar of hand soap, but it is great for shredding and dissolves nicely in the washing machine.):
Laundry Soap Bar:
20 ounces Canola Oil
8 ounces Coconut Oil
12 ounces Olive Oil
5.6~ounces Lye
14.4~ ounces Goat Milk (Previously frozen, and then thawed to slushy stage)
Scents (I prefer to use 2 ounces) or Additives of Choice
5.7 Ounces Lye
15.2 Ounces Goat Milk (Previously frozen, and then thawed to slushy stage)
Scents (I prefer to use 2 ounces) or Additives of Choice
*Rendered lard (your own or from the butcher) works best for this recipe.*
Another simple soap recipe that I use for making laundry detergent (This tends to make a soft bar of hand soap, but it is great for shredding and dissolves nicely in the washing machine.):
Laundry Soap Bar:
20 ounces Canola Oil
8 ounces Coconut Oil
12 ounces Olive Oil
5.6~ounces Lye
14.4~ ounces Goat Milk (Previously frozen, and then thawed to slushy stage)
Scents (I prefer to use 2 ounces) or Additives of Choice
Additive Options:
Honey Oatmeal soap: add finely ground oatmeal and 1 tsp. honey.
Cucumber soap: add finely chopped cucumbers.
Cinnamon Swirl soap: add cinnamon to half the batch of soap after trace, then pour the colored soap into the plain soap, gently swirl. Don't mix too much, as you only want a pretty swirled look.Basic Directions:
*Prepare your molds~ Spray plastic molds with cooking spray. Line other molds with plastic wrap.
*Measure the lye, set aside.
*Heat oils to 90 degrees in a stainless steel pan.
*Pour slushy goats milk into a stainless steel container, place in a sink with ice water. Slowly add the lye to the milk while continuously mixing with a wooden spoon. Cool to 90 degrees.
*Add the warm oil to the milk solution and mix with a stick blender (off and on) until light trace.
*At light trace add any scents, colors or exfoliates.
*Continue to mix. At trace pour into prepared molds.
*Wrap with plastic wrap, then cover the mold with a towel.
*After 24-48 hours cut the bars (wear plastic gloves as the lye can still burn your hands). Allow soap to cure 3-8 weeks before use.
Supplies needed: Stainless steel pail, stainless pan for the stove top, scale, thermometer, wooden spoon, spatula, electric wand mixer, soap mold, saran wrap or cooking spray, plastic gloves, safety glasses, newspaper, old bathroom towel, vinegar (None of the mixing items should be used for food use again).
Always wear plastic gloves, long sleeves, and eye protection when making soap.
If you're looking for supplies, scents or anything soapy, check out Brambleberry.
 To start with, prepare your work sight and everything you will need to make soap. I haven't had a problem creating soap in my kitchen, with the windows open for ventilation. FYI~ only use glass or stainless steel to mix your soap in, and don't plan on using them again as they could possibly retain some lye. I use stainless steel milk pails as they are high enough to prevent spills.
I lay out newspapers at each of my work stations (next to the stove top, next to the sink, and on the island where I will set my pail to mix) for easy clean up and to catch any spills.
Once you have all of your supplies out, start by preparing your soap molds. If you are using a wooden soap mold (like I am), you will line it with saran wrap, taping it down as needed. My wooden molds measure 15" long, by 2 3/4" high, and 3 1/2" wide inside diameter. They are the perfect size for this recipe, and you end up with 14 nice sized bars of soap.
 Spray your plastic molds lightly with cooking spray. Any plastic container, or even a cardboard box lined with saran wrap will work fine. Just be sure that you don't make your soap too thin, or else it will curl as it dries.

Pour your slushie goat's milk into your pail, and set in a sink with ice water. Pre-measure your lye and set aside.
 When everything is prepared, it's time to heat up your oils. You want to reach a temperature of 90 degrees. The oils heat up rather quickly, so keep a close eye on them. Once you reach temperature, shut the heat off and set the pan aside if you are using an electric stove to prevent overheating.
 Now, let me put the fear of God into you about lye. Lye is caustic: it will burn, it will blow up your kitchen, and you have the potential to lose your eyesight and will never be able to gaze upon the love of your life or your sweet little dumplings ever again if you are not careful. Be warned! And then just be cautious. NEVER, NEVER pour your liquids into your lye. Always pour the lye into your liquid~ slowly.
If you happen to get lye splashed on you, or even start to feel any tingling while making your soap, pour vinegar over the affected skin. Eyes would need to be rinsed out with water, and then seek immediate medical attention (but of course you're wearing your protective glasses). Don't hover over your pail! Don't ask me why . . . Turtle necks are great to wear while making soap.
Slowly, pour your lye into your slushie milk in the sink of water and ice. Your milk will start out white, but you will soon see it turning yellow. If you pour the lye too fast, it will actually burn and even curdle your milk. The slower you pour your lye, the lighter your soap will be. The quicker you pour, the darker your soap will be.
The lye is going to heat up the milk: sometimes very fast, sometimes slow, depending on how cold your milk and your sink is, and how fast you are pouring. You are trying to achieve a nice, steady increase in temperature. If the colors stay a pretty yellow it is a good indicator that your milk is not too hot and not too cold~ orange means "too hot" and you need to add more ice to your sink.

 Once you are at 90 degrees, take your pail out of the sink and put it on your newspaper lined work station. Slowly add your warm oils while mixing with your wooden spoon.
  Now it's time to start blending. A stick blender works great for this (but remember, you can't use it again for food use). It is possible to mix by hand with a wooden spoon, but it will take about 2-3 hours of constant mixing.
The mixture will start out pretty thin, but within 10-15 minutes you will begin to have a pudding consistency. This is called "trace." You are looking for a light trace so that you can add your scents or additives. When your mixture starts to get thicker, take your wand and drizzle the soap across the top of the mixture~ if it holds itself up, you are at trace.
 At a light trace you can add your scents and additives. Watch your soap carefully at this point. This is prime time for seizing (when additives make your soap instantly become rock hard). I have personally never had any soap seize, but there's always a first time. More often I find that the soap thins out as you have added more liquids. Mix until you get back to a thicker trace, keeping in mind that your blender is warm by now, too, and adding to the heat of your soap mixture. It is fine to let the soap sit quietly for a couple/few minutes rather than burn out your blender or overheat your soap.
At this point, since I am layering this batch of soap, I will pour part of my batch back into my oil pot.

Next add your colorant to the pail and mix again.

 I scrape off every last little bit with the spatula.
 And then pour.
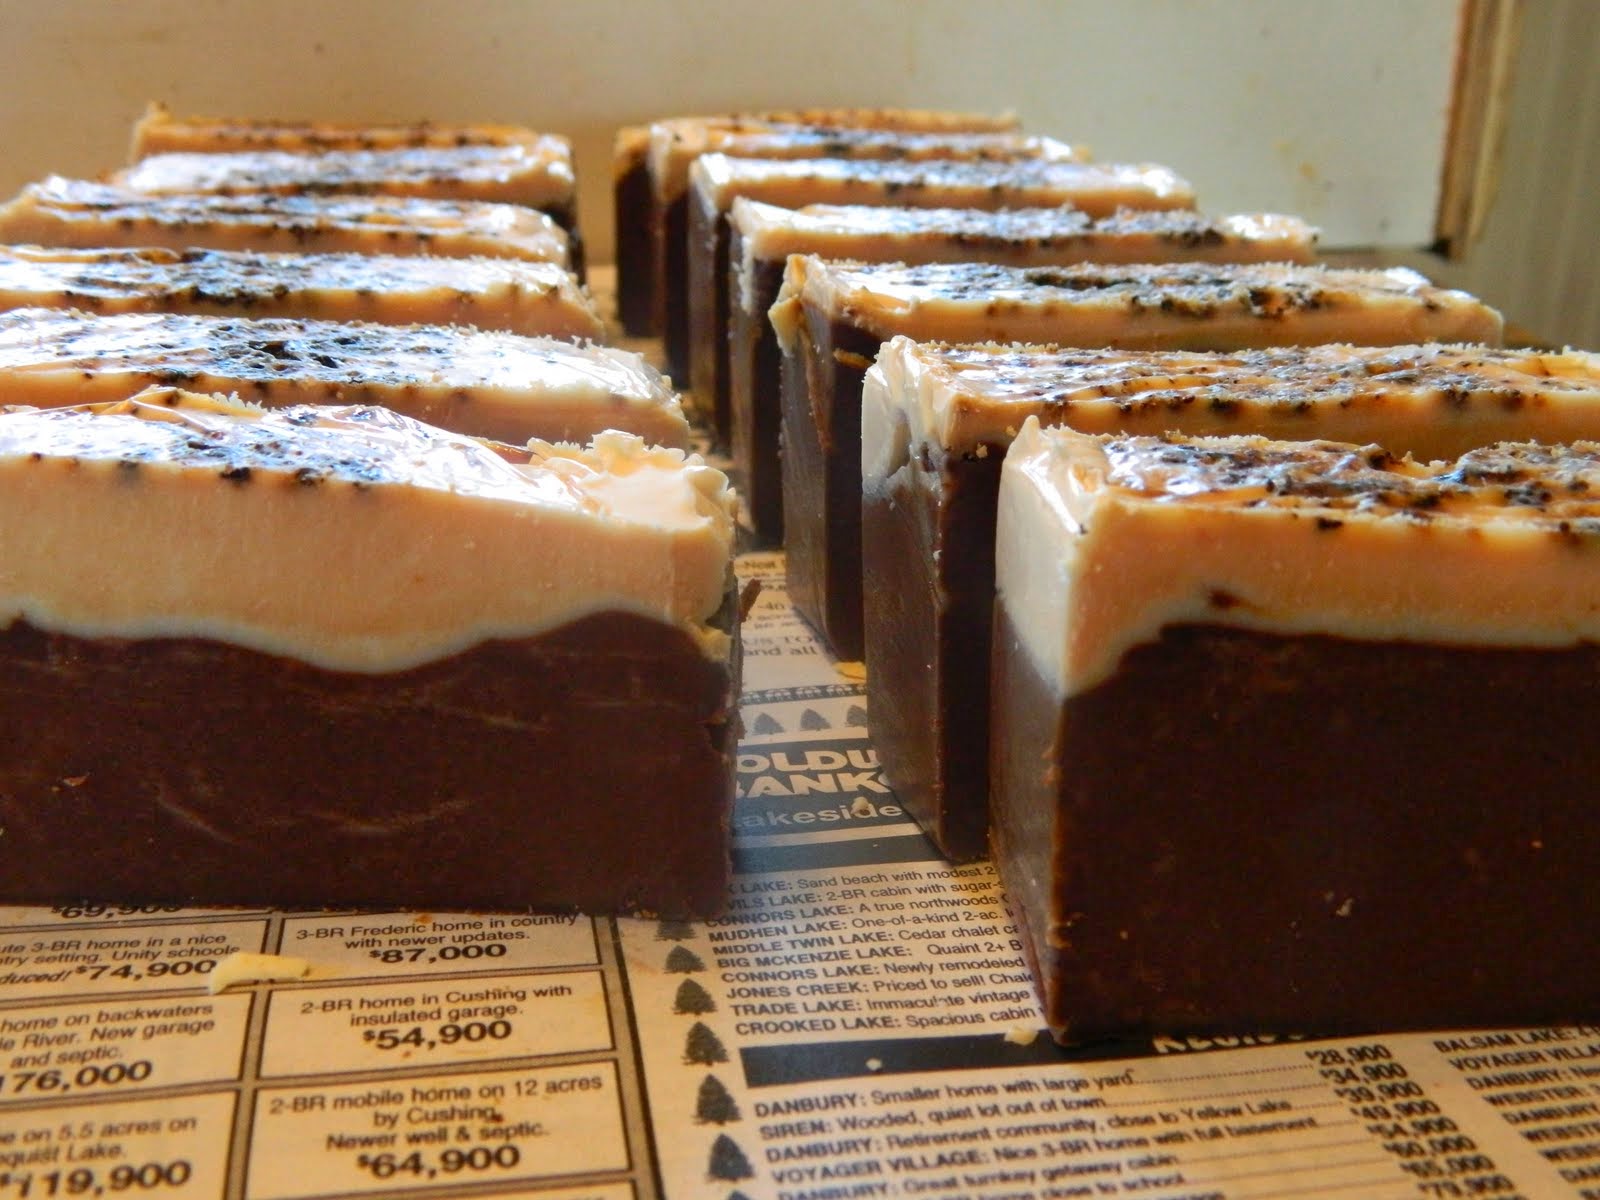
Next, I pour my light color on top.

Because I used Hazelnut Coffee scent, I sprinkled the top with coffee grounds to look pretty.
 Then I cover the soap with saran wrap, and wrap it all up in an old bathroom towel to incubate over night. To prevent soda ash you will want to gently press down the saran wrap to reduce any air getting to your soap. After 24-48 hours it's time to cut your soap. If you happen to peek at your soap before this time frame and see a big, gooey mess don't worry just yet~ soap goes through a gel phase, but within 12-24 hours it should be back to a nice, beautiful log of soap that is ready to cut. If it feels too soft, let it sit longer until it hardens.
*After having some recent batches overheat, I have been experimenting with not insulating my goat's milk soap with great results. To gel or not to gel is another post for another day.*
 I use a cheese cutter to get perfect sized bars, but you can also use fishing line, knives, or fancy crinkle potato slicers (just remember, don't use them for food again). The lye can still burn you at this point, so always wear gloves while cutting your fresh soap.
Find a spot to let your soap cure. I have a drying rack, lined with newspaper, in an out of the way closet. Basements are too damp to allow proper curing, and warm spots will dry out your soap too quick. After 3-8 weeks your soap will be fully cured and ready to use. Soap never goes bad, and only gets better with age.
Enjoy the benefits of your very own homemade goats milk soap!
*************
Soap is great, but have you found eternal life?

It is only considered “the unthinkable” because our plans are not God’s plans, and our ways are not God’s ways.
Before Trent was born we had entrusted the Lord with his life and had asked Him, above all else, to bring salvation to our son. Our greatest desire was that he would be used in a mighty way for God’s glory, and that God would let him dwell in heaven for eternity.
Trent was a boy who truly lived. From the very beginning he did what he loved and enjoyed to the full the gifts and skills that God had given him. In his short life he saw much of this world, traveling as far as India, the Bahamas, Bass Pro Shop in Missouri where he explored his favorite destination on his golden birthday, as well as many family camping trips. God instilled a love of hunting and fishing in Trent, and a joy of the great outdoors. Since he was little all he wanted was to turn 12 to be able to go deer hunting. During his 12th year God allowed him to shoot two deer. Trent loved to pick on his siblings Alexis, Cole, Grace, and Micah, to protect his mother, to snuggle with his father, and to be with his friends, especially his best friends: Thomas and Samuel. He tried everything that interested him, even carving his own long bow and succeeding in taxidermy. In his short years he lived life to the fullest.
But as we are all destined to, Trent also died. On Friday, February 18, 2011, we said goodbye to our son as he left for a skiing trip with his friends, not knowing that he would never be coming back home. God says that He knows the number of our days, that He has created each one, and that He will do what He pleases (Psalm 115:3; Job14:5).
God’s standards to enter His kingdom are high: He expects perfection. Trent was not perfect, not even close. God graciously provided His perfect Son, Jesus Christ, as the atonement for our sinfulness and requires that we simply believe and acknowledge Him for it.
For most of his life Trent struggled with his own sinfulness before God. He knew that he was not right before God, and nothing he could do would ever make up for the sins he had committed to make him worthy to enter heaven. In the spring of 2010, God graciously chose to bring salvation to Trent through repentance and the saving grace of Christ Jesus. Trent’s life was transformed and we enjoyed the young fruit in his life as we watched God work.
It was with great peace and much rejoicing, then, that we as his family have sent him off before us and accepted God’s perfect plan for Trent’s life. Our longing is that God would be glorified in what He has done to wake up many to the realization that we are not guaranteed any number of years in this world (Psalm 39:4-5).
On Friday morning we had our son; on Friday afternoon he was gone.
What we have asked so many people since the accident is: “What if it had been you? Where would you be right now?”
God's mercies are new every day and His peace does surpass all understanding (Lamentations 3:22-23; Philippians 4:6-7). God has been so gracious to us by blessing us first of all with His peace in His perfect plan. The family and friends who have surrounded us and have lifted us up in prayer are amazing and another testimony to God’s goodness.
It is with great rejoicing that we release our son, Trent, age 12, to our Heavenly Father. Dance before your King, my son.
On Friday February 18, 2011, God did the unthinkable in our life: He chose to take our 12-year-old son, Trent, home to heaven in a skiing accident.
It is only considered “the unthinkable” because our plans are not God’s plans, and our ways are not God’s ways.
Before Trent was born we had entrusted the Lord with his life and had asked Him, above all else, to bring salvation to our son. Our greatest desire was that he would be used in a mighty way for God’s glory, and that God would let him dwell in heaven for eternity.
God answered our prayers that Friday in a mightier way than we could have imagined, and we have been rejoicing in His good works and His mercies ever since.
Trent was a boy who truly lived. From the very beginning he did what he loved and enjoyed to the full the gifts and skills that God had given him. In his short life he saw much of this world, traveling as far as India, the Bahamas, Bass Pro Shop in Missouri where he explored his favorite destination on his golden birthday, as well as many family camping trips. God instilled a love of hunting and fishing in Trent, and a joy of the great outdoors. Since he was little all he wanted was to turn 12 to be able to go deer hunting. During his 12th year God allowed him to shoot two deer. Trent loved to pick on his siblings Alexis, Cole, Grace, and Micah, to protect his mother, to snuggle with his father, and to be with his friends, especially his best friends: Thomas and Samuel. He tried everything that interested him, even carving his own long bow and succeeding in taxidermy. In his short years he lived life to the fullest.
But as we are all destined to, Trent also died. On Friday, February 18, 2011, we said goodbye to our son as he left for a skiing trip with his friends, not knowing that he would never be coming back home. God says that He knows the number of our days, that He has created each one, and that He will do what He pleases (Psalm 115:3; Job14:5).
God’s standards to enter His kingdom are high: He expects perfection. Trent was not perfect, not even close. God graciously provided His perfect Son, Jesus Christ, as the atonement for our sinfulness and requires that we simply believe and acknowledge Him for it.
For most of his life Trent struggled with his own sinfulness before God. He knew that he was not right before God, and nothing he could do would ever make up for the sins he had committed to make him worthy to enter heaven. In the spring of 2010, God graciously chose to bring salvation to Trent through repentance and the saving grace of Christ Jesus. Trent’s life was transformed and we enjoyed the young fruit in his life as we watched God work.
It was with great peace and much rejoicing, then, that we as his family have sent him off before us and accepted God’s perfect plan for Trent’s life. Our longing is that God would be glorified in what He has done to wake up many to the realization that we are not guaranteed any number of years in this world (Psalm 39:4-5).
On Friday morning we had our son; on Friday afternoon he was gone.
What we have asked so many people since the accident is: “What if it had been you? Where would you be right now?”
We diligently raised Trent up to know his sinful state and taught him what the Word of God says because we know the implications of denying Christ now, and God was gracious to answer our prayers and to save him. Scripture says that the gospel will go forth with much sorrow and heartache. Please let Trent’s short life be a wake-up call to you. We are rejoicing in the sorrow because we know where our son is and that we will one day be with him again for eternity because of our own salvation.
God's mercies are new every day and His peace does surpass all understanding (Lamentations 3:22-23; Philippians 4:6-7). God has been so gracious to us by blessing us first of all with His peace in His perfect plan. The family and friends who have surrounded us and have lifted us up in prayer are amazing and another testimony to God’s goodness.
It is with great rejoicing that we release our son, Trent, age 12, to our Heavenly Father. Dance before your King, my son.
51 comments:
As the first ingredient, I am assuming you meant just "goat's milk" rather than "goat's milk soap?" Can't wait to try it (in a few years, of course!)
Thanks so much for sharing the recipe. Look foward to trying. Have a great night Rebekah.
Ooops! I'll change that little ingredient right away:)) Terri
Great job! This is also on my list of to do. Dalyn said she would teach me. Love the molded ones!
Good dispatch and this fill someone in on helped me alot in my college assignement. Thank you for your information.
I've made soap several times but never used lard. Can tallow be substituted for the lard? This recipe sounds yummy!
thanks,
sarah
sjonesy~ These recipes say that you can use tallow rather than the lard. Here's the link
http://www.millersoap.com/soapanimal.html
Happy Soap making! Terri
this post is great and a friend and are going to make soap for the first time this weekend using this recipe! she has the goat's milk i have the lard :) question - do we need to use stainless steel pot or can we use a plastic bucket?
also, is there a problem doubling the recipe (as long as we have the space for mixing) or should we do a batch a time?
thanks so much!
renee
Thanks Renee!
Yes, you should use stainless steel or glass to mix your soap in as the mixture will heat up very hot when you add the lye. I use a stainless steel milk bucket which works great~ remember not to use your container for food use again.
I have never made it in a double batch, as the recipe is the perfect size for my pail and my soap molds.
Happy soap making! I think you will be surprised at how easy it is to make:)) Terri
Here's a link to an oil recipe soap I also like as the ingredients are easy to find, although it is a softer bar:
http://ourcrazyfarm.blogspot.com/
Also, if you make the lard recipe it is so much better with some coconut oil in it to give it better lather and bubbles, but you still get that hard bar of soap. Recipe:
35 ounces Lard
5 ounces Coconut Oil
5.8~ ounces Lye
14.4~ ounces Goat Milk(frozen, and then thawed to slushy stage)
Scents (1 ounce +) or Additives of choice
100-110 degrees.
This is a great recipe to add honey and oatmeal!
When creating a new soap recipe~ Always use a conversion calculator as the quantity of oils versus liquids and lye need to be adjusted as well!
Conversion Calculator:
http://www.soapnaturally.org/calculator/
Both recipes will make about 13 nice size bars of soap. Any liquid can be substituted for the goat's milk, but the goat's milk is what makes it so luxurious. Please just ask if you have any more questions! Thanks! Terri
I want to use this recent recipe for goat milk soap using the coconut oil and lard. I'd like to add the oatmeal and honey as you suggest. How much of each if I follow the previous recipe in your comment? (I assume all the ingredients are weighed) Thank you!
One more question: Can I use less tallow/lard and more oil such as olive oil? Thanks!
Thanks AD!
I would recommend using about 1 Tablespoon of honey. Goats milk soap heats up very hot, and honey has a tendency to heat it up too hot and ruins the batch of soap if you add too much.
As far as the oatmeal~ you can use as much or as little based on your preference. Start with about half a cup of oatmeal at trace and see how it looks~ keep adding if you prefer more.
Yes~ you can add olive oil to this recipe in place of the lard. I just made a couple of batches (which are still curing) using these measurements:
Lye: 5.7 ounces
Goat's Milk: 15.2 ounces
Olive oil: 12 ounces
Lard: 18 ounces
Coconut oil: 10 ounces
It is still on the drying rack, but according to the conversion calculator (link in previous comment) it should make a luxuriously wonderful bar of hard soap with lots of bubbles.
Adding oatmeal to the recipe without lard does not work so well as the bar is a softer bar of soap than the lard recipe makes.
This recipe will also make about 13bars of soap.
Hope that helps! Terri
This recipe seems similar to one I used to have but it made amaller amounts. Could you safely reduce for smaller batches?
Here's a link to a smaller batch of soap using mostly the same ingredients, Kat.
http://ourcrazyfarm.blogspot.com/2011/11/soap-molds-and-how-to-make-goat-milk.html
It makes 13 nice sized bars of soap with the mold dimensions in the post.
Anytime you want to reduce a batch of soap I would request running the recipe through a conversion calculator like the one here:
http://www.brambleberry.com/Pages/Lye-Calculator.aspx
Thanks! Terri
Are your recipes by weight of volume?
They are by weight, Allen.
I would love to incorporate some shea butter to this recipe? Would that be possible? The moisturizing of the goat's milk and shea would be awesome!
Yes, Angie, Shea Butter would be awesome in this recipe! My suggestion would be to run the recipe through a conversion calculator to determine the correct amounts. Often times changing one ingredient changes the milk and lye measurements as well.
Brambleberry has a great calculator here:
http://www.brambleberry.com/Pages/Lye-Calculator.aspx
Happy soap making!
Sept. 7, 2013 5:13pm General Santos City, Philippines:
Today at 9am, we made our first batch of soap using your recipe, we tweaked it a bit - used HTST pasturized goats milk which we produce (we used the one's about to "expire"), will try raw milk soon.
I'd like to share this: we made lot's of ice a couple of days before - heated the oils first, and brought it to the garage/outdoors where we mixed the milk and lye. We did an ice bath loaded with LOTS of ice and used refrigerated milk instead of slush - the temperature never got over 90 degrees due to the amount of ice surrounding the container - in fact, due to our excitement, we "forgot" to take out the container from the ice bath and since the temperature was hovering around 80-85 degrees - we started to add the heated oil - the mixture never made it to 100 degrees - we attained "ribbon" texture rather fast - everything else we followed according to your recipe/instructions - it's beautiful!
We added eucalyptus oil - it smells delicious!!! Can't wait to cut it up and cure them!
Thank you indeed for sharing your knowledge - I will keep you and the other readers posted on the outcome of this "forgetfulness" of mine.
So many versions to try! Can't wait - many thanks again...
Thank you for sharing your success story, Marc! I am so excited for you to have made your first batch of soap! That first try can be pretty intimidating, but it sounds like you did great. Yes, please keep us updated!
This will be my first soap try! I have a wooden mold that holds 3 pounds. Would I need to double this recipe? I dont know how much this recipe makes... thanks
This will be my first soap try! I have a wooden mold that holds 3 pounds. Would I need to double this recipe? I dont know how much this recipe makes... thanks
Good luck with your first batch of soap, Candace! I hope it turns out well!
The recipe should make a 3 1/2 pound log of soap. I use a wooden mold that measures 15" long, by 2 3/4" high, and 3 1/2" wide inside diameter. It makes 14, four+ ounce finished bars of soap.
You can use any plastic container (sprayed lightly with cooking spray and not to be used for food again) or a cardboard box lined with saran wrap or wax paper for the extra soap.
Happy soap making! It's a fun hobby!
Thank you! That's the size my mold is, so it'll be perfect!
This is Candace! I just made this!! My first batch ever! :D
Yay! Hope it turned out great! That's so exciting!
Thanks for the wonderful recipe and detailed instructions. I made my first batch ever in the last week of August and have been using and enjoying this soap for several weeks now. Luxurious creamy lather, everybody loves it!
You're welcome, Sarah! We love it here, too:)
Have you ever experienced your milk and lye mixture not heating up? Tried your recipe with my daughters today and for some reason I couldn't get my lye mixture to heat up over 59 degrees. Tried it twice - same thing. So strange! Any tips?! Thanks! - From another 40-something mom on a crazy farm in San Diego County! :)
Erin~ I have not had trouble with the lye/milk mixture not heating up unless there were too many ice cubes in the sink of water. If it is not heating up I pull the pail out of the cold water and it usually heats right up.
Or, maybe your goat's milk was still too frozen with too many large, solid chunks. If that is the case, you probably wouldn't need to have the pail immersed in a sink of ice water. Make sure that you crush up the big frozen chunks. I usually use mine when it is at a slushie stage.
Did you try mixing the milk/lye mixture with the oils? Did it ever get thick or come to a trace?
The colder the milk and lye mixture stays will help to keep your soap a whiter color rather than carmel/tan (it will look lemon yellow after the lye is mixed in). So if you want a white bar, you would want cooler temperatures. If you wanted a dark bar you could let the milk heat up fast by using no ice (just watch so it doesn't turn orange or curdle).
Let me know how it turns out! Terri
Terri - Thank you for your quick reply and your valuable feedback. We did actually remove the milk from the ice bath and gave it another 20 minutes of stirring to see if it would heat up. It just hovered at about 59 degrees and never got any hotter. You know, I think I'd just like to blame our goat. It's her milk, right?! Ha! I thought there might be something wrong with the lye? Hard to know. I just know that when we made our first couple batches a couple months ago - the milk and lye mixture heated up pretty quick. It definitely didn't take as long as this was taking us yesterday. My milk wasn't quite at the slushy stage like you mentioned. I'll try it again this week and make sure the milk is slushy, purchase some new lye and see what happens. Thanks so much. Love your blog. So inspiring. -Mom on Lemonade Farm
Hi, I have made it two times and I believe I have made a couple mistakes but not sure what they are. lol For one I thought I had Caster Oil but I had mineral oil and I did use it in place of the Caster oil.
Next I haveindividuale molds that I have been using and I ruined every bar getting them out on the first batch and so on the second batch I did spray them with cooking oil and I only ruined most of them getting them out. Is that because of the mineral oil or am I doing something else wrong. I did take them out after 24 hours.
Thanks Jackie
Sorry to hear you've been having trouble, Jackie! If you lived close I'd come right over and look at your creations:)
The mineral oil is probably the problem. It is a basic ingredient when you are making petroleum jelly (Vaseline like) products, so it probably threw the texture of the soap off. Try it again with the Castor oil - or if you don't have it and don't want to wait you can use the recipe without it. The castor oil gives it an extra "uumph" to create lots of extra luxurious bubbles, but the recipe works fine without it, too. Just accommodate the extra two ounces with the olive oil.
As far as the soap sticking~ again, it could be the mineral oil's fault. Try lining your molds with Saran Wrap and the soap should be easier to get out and also to clean the molds. If the soap does get hard you can always let it cure and shred it to use in laundry soap.
My laundry soap recipe is here: http://ourcrazyfarm.blogspot.com/2012/08/home-made-goats-milk-soap-laundry.html
Good luck on your next try!
Thank you for your quick response, I ran right out and got the Castor oil. So I am about ready to give it another try. Also thanks for the laundry soap recipe. :) I have plenty of bars of soap to use for this. I will let you know when I try again.
Jackie
Your blog is fabulous! I have only made one batch of soap and that was two weeks ago. It turned out really good (as far as I can tell). Your goat milk soap is just what I have been looking for. I just bought some goat milk and came home and put it in the freezer. Please tell me that name of the colorant you used and where you purchase it. Would love to try this. Also, can I use another oil besides castor oil in this recipe? Blessings to you and yours.
Shari~ Thank you for your sweet comments! The brown colorant here is cocoa- but don't use too much or it gives you brown bubbles:) I purchase my other colorants from Brambleberry. They have a fabulous line of everything you can imagine for soaps: colorants, scents, molds, etc. They also carry Castor Oil. You can leave the Castor Oil out, but it is what gives the soap it's luxurious bubbles, so I would recommend using it.
Help! What did you do after your soap came out of the freezer? WRap it up lightly? Cover in saran? My lavender came out great! I wrapped in Saran then a light weight towel. No overheating. Would like to use your freezer method but need more info. Continued blessings to you and yours!
Shari~ After I poured the soap into the molds I have done both: lightly wrap it in Saran Wrap and not wrap it in Saran Wrap before putting it into the freezer.
Not covering the soap with Saran Wrap allows the oxygen to get to it which could cause Soda Ash (which is a light white covering that appears after your soap dries~ it is not harmful, the soap just doesn't look as pretty initially, but it washes off after the first use).
I have left the soap mold in the freezer for an hour and I have also left it in the freezer for several hours (depending on if I forget to take it out or not:). Once I take it out of the freezer I allow it to sit in a quiet place for the remainder of the 24 hours and then cut it.
Feel free to leave your email in a new comment (I won't publish it) and I will be happy to email you back to help you out with any other questions!
Hi Terri, Well it took a while - but I finally got back to the basement to take another shot at your recipe after I had issues with my lye and milk mixture the last time I tried it with my daughter. Had so much fun this afternoon and everything went as planned. However, when I got home this afternoon to check on the soap, one of the batches (which was a beautiful creamy color when I poured it and left it) has turned dark in the center. Almost looks "raw" in the center part and the edges are still a pretty creamy white color. What has happened? I'm so sad! Also, another batch that we used another recipe on has turned orange - looks funky. But, we never got the lye mixture over 79 degrees and we added the lye VERY gradually to the milk. I took a long time. Got any feedback on these two little soap hiccups? Thank you so much! -Lemonade Farm Mom
Yay! So glad to hear that you tried it again, Lemonade Farm Mom!
Don't get too scared yet:) Your soap is probably just going through a gel phase. Let it rest and do its magic for a full twenty four hours, then check it tomorrow. Some scents (especially ones with vanilla) will turn your soap dark.
I have had success with putting my freshly poured soap in the freezer for a while after pouring it into the molds to try to prevent a hard gel. If there is a ring in your finished soap tomorrow that indicates the gel stage.
Good luck! I know how hard it is to wait, but everything should be fine.
Hello Terri,
Hope you had a nice Thanksgiving. Wanted to ask a quick question. Do you pasteurize your goat milk before freezing for soap? I do, but would LOVE to eliminate that step and use it raw. Does it matter. I have read both. Thank you and blessing to you and yours. - Lemonade Farm Mom :o)
Lemonade Farm Mom~ Nope, I don't pasteurize our milk. After milking the goats I strain it and freeze it. Happy soap making!
I want to do this so bad! I just started milking my goat and am already starting to get a nice stash of milk in the freezer. Pinning this for later when I get the guts to play with lye. Thank you for the great post with pictures!
I tried my first batch the other day...smells wonderful and when it went into the molds it was a very soothing orchid color. When I took it out yesterday it is all milky white. I cut one open and the white seems to only be a very thin layer on all outer edges. Please, what did I do wrong? I am about to start another batch and I don't want to make the same mistake again.
Thank you for all your loving support! Your blog is super ))
Julie
Julie~ It sounds to me like a temperature issue, most likely your soap went through a very hot gel phase. Next time, after pouring the soap in your mold and covering it with Saran Wrap, try putting it in the freezer. Even leaving it in there for thirty minutes will help keep the soap cool and should prevent such a hot gel process.
There could be some colorant issues going on otherwise as some colorants are heat sensitive. And some scents will do wonky things if they get too hot as well. But my guess, without seeing your soap, is that it got too hot.
Try, try again. The wonderful thing about homemade soap is that you can almost always either redo it or at least grate it up for laundry soap. Good luck next time!
Do you use raw, pasteurized or unpasteurized goat milk? I was told to use unpasteurized. What is best? Thanks!
Mama Bear~ I use raw, frozen goats milk. Happy soap making!
Your tutorial is so thorough and has wonderful pictures. Thanks so much! I made quite a few batches of soap about 15 years ago, but never with goat milk. Well, I have three milking goats and milk is coming out my ears! I have a whole freezer door full of milk, and practically the whole fridge is full of milk or goat cheese or kefir!! I have been feeding the other animals clabbered milk!! Oh my. My family is going to disown me :)
I've been wanting to make soap for months but I couldn't find a local source for lye. Besides, I was pretty nervous because it's been so long and I heard that things can easily go haywire with milk soap....Your directions have given me the confidence that I needed. I'm going to buy lye, castor oil, another hand blender (because I burnt the motor out of the other one) and I'll be SET! Thanks again and God bless!
I glanced through your recipe but as a photographer, I am always drawn to the images. I stopped to stare at your beautiful son's picture, that is when I read about his passing.
I am a bible believing Christian and although I know how painful it is to let go of our loved ones, I also know we will see them again.
Thank you for sharing such a touching post about Trent, I am sure he is walking those streets of gold, holding our Savior's hand.
Blessings,
Mary
Thank you for sharing the story of your son Trent with us. I cried, as all mothers must have done when reading your story. Not just for your loss, but for your incredible love you have in Jesus Christ and the example you are setting for all people, in how to be an amazing child of God. As a mother of 5 I cannot begin to imagine the pain you have, and sometimes still do, feel. I have a feeling I will refer to your post here, not for the soap making lesson, but for the living your life for the Lord lesson. Thank you.
Post a Comment